Thursday, August 22, 2019

Elderberry season...

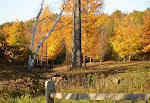
It is somewhat shocking how close September is... just a little over a week away! Though I do look forward to autumn, and an end to the heat and humidity, it is always bittersweet to be aware of how quickly time passes. In a few weeks, the lonesome call of Canadian geese heading southward will be filling the air, as well as their V-formations.
The flower gardens have flourished this year, but so have the weeds. It's been a struggle keeping ahead of them, and I've just about lost that battle. There is an abundance of apples and blackberries, yet only a few pears on the trees. The raspberries are coming on again after the first early flush gave up due to the heat and lack of rain. The vegetable garden suffered immensely from chipmunks and red squirrels... I have never seen as many as there's been this year.
Now, the elderberries have begun to ripen, I noted as I watched a bird stealing beak-fulls of them the other morning, so I plucked off enough to make a batch each of Elderberry Syrup and Elderberry Tincture. The tincture will be ready to use in about 6 to 8 weeks... just in time, as flu season starts in October. If the birds don't eat all the berries, I will dehydrate some as they continue to ripen, although I have a quart of dried berries still from last year as back up. (NOTE: If using dried elderberries instead of fresh, use half the given amount.)


To make either, gather the berries when they are dark, deep purple... almost black.Simply twist the whole stem and it should snap the complete umbrel of berries off.


In the photo above, you can see the ripe berries towards the center. Below shows just what you're aiming for.


I find it's easy to strip the elderberries off by grasping the main stem, and using a fork turned upside down around the smaller stems to pull off the berry clumps.


I am making Elderberry Syrup here, and I ended up with roughly a cup of berries. I put these in a pot, added three cups of water, and brought the mixture to a boil. (I often add a 2 inch chunk of fresh ginger root and a 1 inch chunk of fresh echinacea root which I slice into small pieces at this point, too.)  Reduce to a simmer for about a half-hour, mashing the berries as the heat softens them, then take off the stove and let sit for about an hour.


Strain through a few layers of cheesecloth, squeezing the cooled berries to release the juice. There will be some pulp and a lot of seeds remaining... I just toss them into the compost pile.


Next, mix in about a half-cup up to one cup of pure, raw honey and mix well. If you desire, you may add a half-cup of brandy, but I did not. I just poured the Elderberry Syrup into an 8 ounce bottle, capped it and stored it in the refrigerator. It should keep for about two months. To use Elderberry Syrup, I take a teaspoonful daily from mid-October through March. If I feel I'm coming down with something, I'll take that dosage two or three times per day.


To make a simple Elderberry Tincture, I put the prepared berries in mason jar, cover with brandy (or vodka), cap the bottle and store in my cool, dark pantry for about 4 to 6 weeks, gently swirling the bottle every few days to mix it. I take a half-teaspoon every day once I've run out of the syrup.

Tuesday, June 25, 2019

A Tree Story


This is a tale of a tree that has stood watch upon a little hill for over 70 years. A common Red Maple, it was planted by Garner Tripp  in the 1940's or 1950's, on the southern side of his hunting camp,. Garner's cabin burned to the ground a few decades later, but his growing tree withstood the fire. We bought his property in 1983, built our house a year later in pritnear the same spot his cabin had stood on, and that same maple continued to watch over our home, too. Throughout the years, its arms have cradled numerous bird feeders, swings, birds, squirrels, chipmunks, climbing children, and an occasional raccoon. In spring, thousands of its whirlybird seeds spin down, blanketing everything below. In summer, its thick arms create a cool, shady respite where the porch swing hangs. Come autumn, its boughs hold a full bounty of colorful foliage, soon tossed to the ground and scattered by the wind. And all winter long, a wild assortment of creatures and birds find food in and under the many feeders adorning its branches.

Many days over the past several years, as I sit in the porch swing, I've noted the tree is not as full as it once was. In gusty winds, large branches snap off and shatter to the ground like broken bones. The canopy of  leaves is shockingly thinner with each passing year. It is a sad fact that this beautiful maple tree is dying. At first, I avoided thinking that the tree's years were numbered, but as time has passed by, I realize that this tree may not outlive me. 


I reminisce of the companion tree that was lost when building our home. The excavator had dug too close to the roots of this other maple, ultimately leading to its demise a few years later. The majority of the tree was used for firewood, but I cut some of the branches into building blocks for my young children. Now, our grandchildren have recently outgrown playing with them. When the time comes to cut down this frail maple, some parts of it will be saved for memory's sake.


It is hard to picture the hole that this silent sentinel's absence will leave, not only in my heart, but in the landscape itself. The circumference of the tree is close to 100 inches, and the amount of cooling shade and protection it casts over the house, lawn and gardens seems immeasurable. The time has come to plant another tree alongside this one, to allow the new one to grow for a few years before the old maple is laid to rest.


Thursday, May 9, 2019

May 2019


May again! It seems we've jumped from the new year to maple syrup season, and right to getting the gardens in order. Spring is a chaotic season in comparison to the solitude and peacefulness that accompanies winter. My dear friend Barb put in an order for onions, and I got mine all in, as well as some shallots and a few dozen strawberry plants. The stored-in-the-cellar dahlias, tuberose, and gladiolus were hauled up this week and given a once-over and sorted. Today was spent planting them, along with a half-dozen new blueberry bushes. Between the rain, I've managed to lay down straw to mulch for weed control between the rhubarb, horseradish, asparagus and strawberries. Seeds are started, and coming up... even with the lack of warm weather and all the rain we've been getting. Finally got my new egg house built and opened for the season, too. I'm feeling accomplished but in reality, I'm just trying to stay ahead of the game! All through the winter, we've been inundated with squirrels... red, grey, and one black squirrel too. Between them, the chipmunks, and the deer, they've wreaked havoc on a number of apple trees, lilac bushes, and crab apples; some of which will need to be replaced. I worry about the certain damage they will cause in the berry and vegetable gardens when things get growing.


Still in all, I am grateful for the changing seasons... the predictability and comfort each brings, like a visit from an old friend. I never tire of hearing the Canadian geese returning, or the peepers call out in the pond and swamps. It is a pleasure to see the various songbirds coming back to the feeders, either to stay for the summer, or just stopping by on their journey northward. I've already seen a few hummingbirds, a couple of rose-breasted grosbeaks, yellow finches, a Carolina wren, hermit thrush, and some bluebirds, along with the regulars from winter! And almost every morning as the sun is coming up, I've been hearing a loon flying west to east, but only for a few minutes. 


As spring slowly creeps across the countryside, native wildflowers appear to brighten a short hike through the fields and woods. The coltsfoot and pussywillows have already gone by, and are being replaced with wood violets, hepetica, bloodroot, cowslips, and beautiful masses of dandelions... each one with a small pollinator in it's center! I've noted numerous skunk cabbage along the edges of the wetlands. The old muskrat is back in the pond, as well as the pair of woodchucks who live under the barn. The pond is teaming with pollywogs, salamanders, turtles, water boatmen, a great blue heron, and a pair each of Canadian geese and wild ducks. Soon the lilacs will be blooming, along with the apple, pear and cherry trees. I hope we stave off the threat of a late frost for their sake. It's been a few years since we've had enough apples for cider.
Yes, spring creeps back in with uncertainty, dragging her feet through the mud as she comes. The only thing predictable about her is her unpredictability!

Tuesday, May 2, 2017


Out in the woods, the delicate pink blossoms of the hepatica are scattered about the back meadow, along with pale purple wood violets. The fiddle heads of ferns are unfurling, and the wild ramps accompany them along the back of the barn. Barn swallows compete with bluebirds for the birdhouse nearest the garden gate. In the small orchard by the chicken coop, the pear trees blossomed today, the sour cherry trees are almost ready to bloom, and the tiny apple blossom clusters are tinged a deep pink, just waiting to burst open!

A peek at the vegetable garden shows two spears of asparagus poking up out of the soil. I picked a large bowlful of spinach this afternoon, and chopped up some chives and got them in the dehydrator. I also finished dehydrating the nettles I gathered yesterday... so far I've gotten one whole gallon of packed, dried nettles for tea and tossing into fall and winter soup.

The peepers still call from the marshy places in the fields and woods. Salamanders can be spotted floating near the top few inches out back in the pond, and while gathering rocks this evening to finish a stone border around the windmill, I came across a few black and yellow salamanders under the stones, as well as a small garter snake. The black flies were pesky enough as the humidity increased tonight, and by the time I finished the chores and settled into the porch swing, it began to rain. As I finish this, the first thunderstorm of the season is winding down, and with it, the anxiety eases for my poor old husky, who even at 14, with failing eyesight and hearing, is still frightened by the flashing lightning.
Happy May!

Saturday, March 18, 2017

Burning wood


Apple wood for fragrance, Ash for violet glow,
Hornbeam, Larch and Sassafras, such lovely words to know.
Sycamore's serenity, Hickory's embrace,
Oak to scatter golden sparks before the watcher's face.


Juniper for incense, Birch for flame and flare,
Someone to come walking in with snowflakes in her hair.
Darkness past the windows, wind about the eaves,
And friend to friend relating the thoughts the heart believes.


Hemlock, Spruce and Poplar, say them softly now;
Chestnut, Pine and Mountain Ash, Beech and Cherry Bough.
                                  ~Esther Wood, 1905-2002


So much of our winter centers around wood, especially in the form of firewood. We heat pretty close to 100% with firewood, using wood furnaces in the garage and shop, as well as in the house. There is also a fireplace in the living room, and two smaller ones in two of the upstairs bedrooms. Both the kitchen and the summer kitchen have wood cookstoves. I use a wood fired stove to boil down the maple sap during sugaring season.
The firewood is cut on our property, hauled out with the tractor, and cut, split and stacked in the woodsheds. After it has seasoned, before winter comes again, it is stacked nearest the wood stoves and furnaces in each building, where it provides warmth yet again. We try to keep two years worth of dry wood ahead.
Most of the wood selected for burning is dead or dying... hickory, maple, oak, white and yellow birch, and especially beech. The beech have been hard hit by blight... not just the big old trees, but the young as well. The bark becomes cankered and checked, and if the trees are not culled, they will topple and decay quickly. It is hard to look at the areas once filled with the soft grey beech trees, now becoming cleared out patches in the woods. Yes, young beech sprout up everywhere and fill in these patches with their bouquets of dry rusty leaves, but their fate will be the same. Still, I am grateful to know that the majority of the wood that is cut to provide our winter comfort were not vigorous healthy trees.
My daughter often scours the woods for various pieces of hickory, ash, pine and beech to use in carving wooden spoons and such. I am waiting for the cutting of the next season's firewood to gather some hickory and maple for crochet hooks. And unfortunately, I have two 20+ year old apple trees that need to be culled and added to the pile for the kitchen stove. The fragrance of burning applewood is a favorite of mine. And I especially love splitting hickory and yellow birch.
Needless to say, it's almost the time of year to start cutting and hauling trees. Like many of you, we were hit with snow from the Nor'easter this past week, and are waiting for some of the snow to melt. Meantime, trees that weren't marked for cutting in autumn will be tied with red tape or a spray painted X, and soon will be laid up in the field to season til the weather is right for cutting and splitting.

Sunday, April 3, 2016

For The Birds


These beautiful vintage images were found on Pinterest. If you are not familiar with this site... be warned at how addicting it is! If you would like to visit my Bird Board, you may find it here

Sunday, March 20, 2016

Spring

What better way to usher in the Vernal Equinox than to include some sentimental quotes from John Burroughs


 To see the fire that warms you, or better yet, to cut the wood that feeds the fire that warms you;
to see the spring where the water bubbles up that slakes your thirst and to dip your pail into it;
to see the beams that are the stay of your four walls and the timbers that uphold the roof that shelters you; to be in direct and personal contact with the sources of your material life; to find the universal elements enough; to find the air and the water exhilarating; to be refreshed by a morning walk or an evening saunter; to find a quest of wild berries more satisfying than a gift of tropical fruit; to be thrilled by the stars at night; to be elated over a bird's nest or a wild flower in spring- these are some of the rewards of the simple life.


I go to nature to be soothed and healed, and to have my senses put in order.


Oh, Spring is surely coming, her couriers fill the air; each morn are new arrivals, each night her ways prepare; I scent her fragrant garments, her foot is on the stair.


I still find each day too short for all the thoughts I want to think, all the walks I want to take, all the books I want to read, and all the friends I want to see.

Monday, March 7, 2016

Gluten-Free (or not) Buttermilk Pancakes


When my grandchildren are here overnight or after school, it never fails that they request pancakes for supper, breakfast, or BOTH! Needless to say, we go through a lot of maple syrup, as well!
This recipe is my old standby... I can only imagine how many hundreds of pancakes I've flipped over the years for my four children and these two grands combined. We've also used the rare leftover pancakes as a base for ice cream sandwiches (or cones) in a pinch!
Because we go through so many pancakes, I make a large batch (16 cups) of dry pancake mix, which I keep in a half-gallon glass jar. I simply add my wet ingredients to a measure of the dry, and we can have pancakes in no time flat! (no pun intended)
First, the pancake recipe...


Gluten Free Buttermilk Pancakes
(to make non-gluten free pancakes, use the same amount of all-purpose flour and omit the xanthan gum)

Preheat a greased griddle over medium-to-medium-high heat on your stovetop


In a bowl, combine
1 and 1/2 cups GF Flour Blend
1 teaspoon Xanthan Gum
1 and 1/2 Tablespoons Sugar
1 and 1/2 teaspoon Baking Powder
1/2 teaspoon Salt and
1/2 teaspoon Baking Soda
Stir well, then add
1 large Egg
1 and 1/2 cups Buttermilk
(NOTE: if you don't have Buttermilk, simply add 1 Tablespoon of vinegar to 1 and 1/2 cups of milk and allow to set for a couple of minutes to curdle)
3 Tablespoons Vegetable Oil
1 Tablespoon Vanilla Extract


Mix gently til all is incorporated, but do not beat. Drop by spoonfuls onto preheated griddle (we prefer silver-dollar size pancakes) Let cook for a few minutes til bubbles begin to appear on pancake surface, then flip and cook for another few minutes til golden brown and set.


Repeat with remaining batter. Serve buttered with Maple Syrup and/or Raspberry Jam.


To make your own 
Gluten-Free Dry Pancake Mix
sift and mix together well in a large bowl


12 cups GF Flour Blend
(or regular All-Purpose Flour)
2 Tablespoons Xanathan Gum
(omit if using regular flour)
1 cup Sugar
1/3 cup Baking Powder
2 Tablespoons Salt
2 Tablespoons Baking Soda
Store in a glass jar with a tight-fitting lid.


     To make a small batch of pancakes, mix together
1 cup of Dry Mix with
1 large Egg
1 cup Milk with 1 teaspoon Vinegar added
2 teaspoons Vanilla Extract
2 Tablespoons Vegetable Oil


*NOTE*
{I use a simple homemade gluten-free flour recipe blend for most all of my baking needs, to which I add 1/2 teaspoon of Xanthan Gum per each cup of GF flour used in a given recipe. I mix together equal amounts of brown rice flour, sweet white rice flour, tapioca starch and potato starch. I purchase each in 5 pound bulks through the buying club/co op I run, and dump them in a 5 gallon food-safe tin, mixing very well}

Sunday, February 28, 2016

Making Kombucha


I LOVE Kombucha! Either plain or flavored, this fermented tea is a delicious way to quench your thirst. And, it's very easy to make a batch, or in my case... two!
The ingredient list is short, and the recipe is simple. You'll need a scoby (often referred to as a mushroom, though it isn't really a fungus!), well water (or distilled water), organic sugar, and a combination of organic green and black tea. You will also need to purchase a cup or so of plain, unflavored raw kombucha from a health food store or grocer. I get Aqua Vitea Kombucha | Kombucha on tap in kegs and in bottles brewed in Vermont on tap at Healthy Living in Wilton, NY or Middlebury CoOp in Vermont.


Unless you know someone who makes their own kombucha, you may have a hard time finding a scoby. For the record, scoby stands for Symbiotic Colony Of Bacteria and Yeast. It's a bit time consuming, but you can grow your own, and it will continue to grow and provide you with a jarful if you feed it and keep it healthy.
To grow your own scoby, purchase about a cup of kombucha. It is important to get plain,unflavored, raw kombucha; do not use the kinds with colorings, flavors, or chia seeds in it.


Once you've purchased the kombucha, you're ready to start the process of growing a scoby. In a stainless steel pot, bring about 1 and 3/4 quarts of distilled water to a steady boil over medium heat. Then, turn heat off and stir in 1/2 cup organic sugar; mix til it's all dissolved. Next, add 2 bags of green tea and two bags of black tea, and let brew til the water reaches room temperature. Remove the teabags, squeezing gently, and in a half-gallon sized glass jar, pour the kombucha in and fill the remainder of the jar with the cooled tea-and-sugar mixture. Make certain, the tea has cooled to room temperature... do not pour hot tea mixture in or you will kill the kombucha ferment!


Cover the top of your jar with cheesecloth, secure with a rubber band, and let sit in a warm, draft-free space in your kitchen, undisturbed, for 3 to 5 weeks. When your scoby first starts forming, it will be very thin... it tends to look like a scum forming on top of the tea. Just leave it and it will continue to grow. When it is about 1/4 inch thick, you can use it to make another batch of kombucha.
To make a gallon of new kombucha when you already have a scoby and about a cup of purchased starter kombucha, bring 3/4 of a gallon of water over high heat to a strong simmer. Remove from heat, stir in 1 cup of sugar, and steep 3 green tea and 3 black tea bags in the hot sugar water. Let mixture cool to room temperature. Gently squeeze out teabags. Place your scoby and about 1 cup of starter kombucha in a 1 gallon glass jar (no plastic!) Carefully pour the cooled sweet tea into the jar. Cover with cheesecloth and secure with a rubber band. Set in a warm draft-free spot on the counter and let ferment for a week or two... until the tea is fizzy and pleasant to taste. Some folks like to ferment it til it's less sweet and very fizzy and somewhat strong; I prefer it mildly fizzy and still somewhat sweet. (The fermenting process eats up most of the sugar) When it tastes good to you, remove the scoby and pour your finished kombucha into a glass pitcher, cover and refrigerate.


Now, you can do two things here; if you want to start another batch of kombucha right away, remember to reserve about one cup of kombucha to add to your newest batch. (You won't have to keep purchasing store-bought kombucha if you do this!)Simply follow the directions again for making kombucha above. If you don't want to make another batch right away, place your scoby in a glass jar and barely cover it with some of the kombucha you made. Add about a tablespoon of sugar to it and mix gently. Store in the fridge until you want to make more kombucha.


Or, if you want to grow a bigger scoby, keep this jar on your counter and feed it about a teaspoon of sugar every week or two. The scoby will grow thicker, and you will be able to peel it into layers. Each layer becomes a new scoby to share! Soon you will be overrun with scobys; I store them all in one jar, covered with kombucha, and try to remember to feed them a teaspoon of sugar now and then. I've read that folks dehydrate their excess scobys and give them to their dogs like jerky treats; I have not yet tried this.
You can also flavor your finished kombucha; however, don't try to flavor it as it's fermenting... wait til the process is complete. I love adding ginger pulp to my pitcher of kombucha in the fridge. I've also cut it with a bit of grape or pomegranite juice. Experiment, and have fun! Cheers!